 A object on a network is given a label called a hostname. On a specific network or the Internet, it separates one device from another. On the household network, the computer’s hostname might be something like New Notebook or FamilyPC. The hostname is also used by DNS servers, allowing you to reach a website with a well-known and simple-to-remember name. This eliminates the need to enter a series of digits (IP addresses) in order to access a website. When installing Ubuntu, the hostname is changed, or if you create a virtual machine, the hostname is dynamically given to the instance at startup. You will learn how to modify the hostname on Ubuntu 18.04 in this tutorial.
Requirements:
- Entry to the terminal
- Dedicated/Private RDP 99RDP
Verifying the Existing Hostname Ubuntu 18.04
Let’s examine the system’s current hostname specification before making the change. Run the aforementioned command in the terminal to discover that.
# hostnamectl
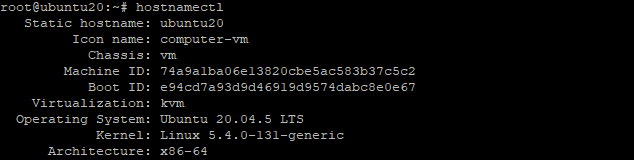
The present hostname and a tonne of other system information are output by this command.
How To Modify Hostname Ubuntu 18.04:
Run the provided command with your new hostname included to update the hostname on Ubuntu. Replace 99RDP with the address that you need.
# hostnamectl set-hostname 99RDP
Once the hostname is changed you can verify the changes by opening the given file /etc/hosts. To open the file in a text editor run the given command
# nano /etc/hosts

In this tutorial, we’ll replace Ubuntu 20 with 99RDP as the hostname. Save the file after making the necessary adjustments.
Using cloud.cfg, preserving the changed hostname
Any hostname modifications will be lost upon a system reboot because Ubuntu by default does not preserve hostname changes. The new cloud configuration, which sets the serve hostname value to false, is the source. Special scripts known as cloud-config files are created to be executed by the cloud-init procedure. These are typically used for initial setup during a server’s very first boot.
Check to see if the cloud-init process is enabled in order to maintain the hostname. Run the provided instruction in the terminal to accomplish that.
# ls -l /etc/cloud/cloud.cfg
The result will be file does not exist if it is not installed. However, execute the provided apt command in the terminal to install the provided script.
# apt-get install cloud-init
Run the ls command once more after the script has been loaded. This time, it will return the script’s authorization and path.
# ls -l /etc/cloud/cloud.cfg

Now use nano or another editor to access the relevant cloud.cfg file. Retain Hostname must be set to TRUE as opposed to FALSE. To do that, run the provided command to access the file.
# nano /etc/cloud/cloud.cfg

Lastly, the hostname will remain the same if you restart the server. Execute the hostnamectl command once more to confirm the adjustments.
# hostnamectl

Conclusion
The establishment of new instances is one of many causes for changing the hostname. You can change the hostname on an Ubuntu 18.04 server without having to restart it thanks to the instructions in this tutorial. I hope this aids you in setting up your server effectively.
Read Our Next Articles How To Setup Python On Ubuntu 18.04