
by Sanjana Shruti | Mar 1, 2023 | Uncategorized
 With the help of the command-line tool sudo, a particular user (or group of users) can execute some (or all) commands with root privileges while maintaining a record of all inputs and outputs. It functions according to each instruction. A “ticketing” method is implemented using timestamp files. A user is given a ticket for 5 minutes, for instance, if they run sudo and input their password. For another five minutes, each successive sudo command updates the ticket. The system administrator can use this utility to change the sudo conf file’s command duration. The conf file is also made up so that it can be copied to numerous machines. This article will show you how to add people to the sudo group. Ubuntu 18.04 is used.
Requirements
- Terminal Access
- 99RDP VPS
Making People Members Of The Sudo Group In Ubuntu 18.04
To begin, either use Putty or log into the computer using the provided command.
# ssh root@99RDP_VPS_IP
Use the provided command to upgrade the VPS’s software and repository list.
# apt-get upgrade
# apt-get update
- Create a new user by executing the provided command after the update is complete, then set the password..
# adduser test
- Enter it once more to validate.
- We will now use the usermod tool to add this 99RDP user to the sudo group.
A Linux programme called usermod can be used to modify a user’s settings remotely. You might need to modify a user’s attributes after establishing them, such as the password or login directory.
# usermod -aG sudo test
Authenticating Sudo Credentials
- Use the user command to switch to the new “test” account.
# su test
- Try listing the files in any root location after changing accounts without using the sudo command. For instance:
# ls
- Use sudo to execute the same instruction now.
# sudo ls

- Open the /var/log/auth.log file to view the logs for each sudo user account on the server. Enter the instruction when prompted to do so.
This will display a list of commands that sudo users have executed. You can see that the ls query was executed by the sudo user in the output.

Conclusion
We learned how to add users to the sudo group in this tutorial. This makes it easier for system administrators to manage checking freshly created user accounts for different criteria. This gives you greater power over the degree of permissions you give to particular users. Please stop by if you have any queries or suggestions.
Read Our Next Articles How To Modify Hostname Ubuntu 18.04:

by Sanjana Shruti | Feb 28, 2023 | Uncategorized
 A object on a network is given a label called a hostname. On a specific network or the Internet, it separates one device from another. On the household network, the computer’s hostname might be something like New Notebook or FamilyPC. The hostname is also used by DNS servers, allowing you to reach a website with a well-known and simple-to-remember name. This eliminates the need to enter a series of digits (IP addresses) in order to access a website. When installing Ubuntu, the hostname is changed, or if you create a virtual machine, the hostname is dynamically given to the instance at startup. You will learn how to modify the hostname on Ubuntu 18.04 in this tutorial.
Requirements:
- Entry to the terminal
- Dedicated/Private RDP 99RDP
Verifying the Existing Hostname Ubuntu 18.04
Let’s examine the system’s current hostname specification before making the change. Run the aforementioned command in the terminal to discover that.
# hostnamectl
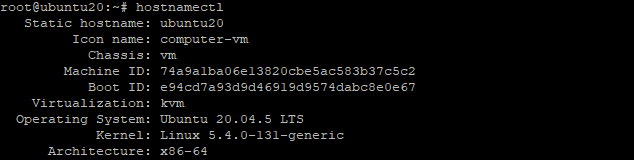
The present hostname and a tonne of other system information are output by this command.
How To Modify Hostname Ubuntu 18.04:
Run the provided command with your new hostname included to update the hostname on Ubuntu. Replace 99RDP with the address that you need.
# hostnamectl set-hostname 99RDP
Once the hostname is changed you can verify the changes by opening the given file /etc/hosts. To open the file in a text editor run the given command
# nano /etc/hosts

In this tutorial, we’ll replace Ubuntu 20 with 99RDP as the hostname. Save the file after making the necessary adjustments.
Using cloud.cfg, preserving the changed hostname
Any hostname modifications will be lost upon a system reboot because Ubuntu by default does not preserve hostname changes. The new cloud configuration, which sets the serve hostname value to false, is the source. Special scripts known as cloud-config files are created to be executed by the cloud-init procedure. These are typically used for initial setup during a server’s very first boot.
Check to see if the cloud-init process is enabled in order to maintain the hostname. Run the provided instruction in the terminal to accomplish that.
# ls -l /etc/cloud/cloud.cfg
The result will be file does not exist if it is not installed. However, execute the provided apt command in the terminal to install the provided script.
# apt-get install cloud-init
Run the ls command once more after the script has been loaded. This time, it will return the script’s authorization and path.
# ls -l /etc/cloud/cloud.cfg

Now use nano or another editor to access the relevant cloud.cfg file. Retain Hostname must be set to TRUE as opposed to FALSE. To do that, run the provided command to access the file.
# nano /etc/cloud/cloud.cfg

Lastly, the hostname will remain the same if you restart the server. Execute the hostnamectl command once more to confirm the adjustments.
# hostnamectl

Conclusion
The establishment of new instances is one of many causes for changing the hostname. You can change the hostname on an Ubuntu 18.04 server without having to restart it thanks to the instructions in this tutorial. I hope this aids you in setting up your server effectively.
Read Our Next Articles How To Setup Python On Ubuntu 18.04

by Sanjana Shruti | Feb 26, 2023 | Uncategorized
A high-level, all-purpose computer language is Python. Code readability is prioritised in its design ideology, which makes heavy use of indentation. It is not specific to any one type of issue and can be used to create a broad range of programmes. It is one of the most popular computer languages today because of its adaptability and beginner-friendliness. You will learn how to set up a programming environment and install Python on Ubuntu 18.04 in this tutorial.
Requirements
- Ubuntu 18.04 is Operating on a 99RDP Private/Dedicated Server
- Entry To The Station
Updated and repository added
First, SSH your 99RDP server and upgrade the system’s local software packages and default repository database. This will stop Python installation errors from occurring.
# apt-get update
# apt-get upgrade
We will add the package repository for “software-properties-common” after the upgrade is complete. You can handle your distribution sources and independent software vendor sources with ease thanks to it. Run the provided command in the terminal to join the repository.
# apt install software-properties-common
The “Deadsnake” package source can also be added. Compared to the Ubuntu default package archive, this repository offers more recent programme releases.
# add-apt-repository ppa:deadsnakes/ppa
Python Setup Instructions
Now visit the official Python website and look up the most recent Linux stable version. We’re going to use version 3.11 for the instruction. To obtain and install the Python build, run the provided command.
# apt install python3.11
Once the installation is complete, use the symlink command to create a shortcut to the Python folder.
# ln -s /usr/bin/python3.11 /usr/bin/python
Finally, execute the provided command to ensure that the interpreter is operational.
# python –version

The loaded version of Python will be returned in the output.
Using pip To Manage Python Components
The pip tool will now be installed, making it easier for us to acquire and set up different Python modules. Install pip by typing the provided instructions in the terminal.
# apt install python-pip
Verify the pip version after the download is finished by executing the provided command.
# pip -V
Executing Your First Hello.py Program On Ubuntu 18.04
Your Python installation is now set to compile codes once all of this is finished. So let’s execute a simple print command from hello.py. Use any editor to enter the provided content in a file, then save it as hello.py.
print(“Hello 99RDP”)
Simply enter python filename.py in the terminal to execute the file, then wait for the results.
# python hello.py

Conclusion
This tutorial showed us how to set up Python’s most recent version on Ubuntu 18.04. Additionally, we discovered how to set up pip and execute a python file. Now that Python 3.11 is installed and functional, you can begin creating Python applications. Please get in touch with us if you have any inquiries or recommendations.
Read Our Next Articles Installing Apache HTTP Server in Ubuntu 18.04

by Sanjana Shruti | Feb 24, 2023 | Uncategorized

Released in 1995, Apache HTTP is a free, open-source, cross-platform web server. It soon surpassed NCSA HTTPd to become the main web server. It served more than 100 million webpages for the first time in 2009 as web server software. Additionally, Apache was crucial to the early development of the World Wide Web. The Apache server project, an initiative to create and manage an open-source HTTP server for cutting-edge operating systems like UNIX and Windows, then appeared.A safe, effective, and extensible server that offers HTTP services in accordance with the most recent HTTP standards is what this project seeks to achieve. based on W3Tech’s evaluation of all webpages conducted in June 2022. With 31.4% of webpages, Apache came in second. This article will teach you how to set up Apache on Ubuntu 18.04.
Requirements
- 99RDP Server Running Ubuntu 18.04
- Terminal Access
Installing the Apache Web Service
Let’s update the system’s existing meta packages first, then carry out the installation. To update the existing software packages and repository database, first open the terminal and enter each of the instructions listed one at a time.
# apt-get update
# apt get upgrade
Enter the instruction to install the Apache web server once the update is complete. And then type y to accept the programmes download dialogue box, then wait for it to complete.
# apt-get install apache2
Once the procedure is complete, view the IP address of the server in a web browser to confirm the installation.
http://99RDP server IP

The presence of the aforementioned page indicates that Apache was set up on your server properly. Let’s move on.
Configuring Firewall For Apache Web Server
We must modify our current firewall settings to permit outside traffic to reach the web server. Enter the command in the terminal to see the inventory of apps in ufw.
# ufw app list

We will only enable standard web traffic on port 80 because we haven’t set up SSL on the server. To enable unencrypted web traffic to the app list, type the provided command.
# ufw allow apache
Additionally, execute the provided command to check the firewall status and confirm that the app has been added to the allowed list.
# ufw status

The app rule has been added to give access to the Apache web server, as evidenced by the output.
Administering the services of the Apache Web Server
Now that the web server and firewall rules have been enabled, let’s go over some fundamental systemctl instructions for managing Apache.
systemctl stop apache2: stop the Apache service.

systemctl start apache2: simply start the Apache service.

systemctl restart apache2: to stop and start the Apache service.

systemctl status apache2: check the current running status of Apache service.

systemctl reload apache2: reload the new configuration changes to Apache service.

systemctl disable apache2: disable the automatic startup for Apache when the system boot.

systemctl enable apache2: re-enable the service to start up at boot.
Conclusion
Using Ubuntu 18.04, we demonstrated how to install and set up ufw for the Apache web server in this tutorial. At this stage, your Ubuntu server can successfully host multiple websites and serve any type of content. Feel free to contact us in the comments section below if you have any questions, concerns, or ideas.
Read Our Next Articles How to Monitor Processor Use in Ubuntu 18.04

by Sanjana Shruti | Feb 24, 2023 | Uncategorized
 To troubleshoot operations that are producing errors, the CPU performance must be closely monitored. Considering that a greater core system operates more quickly and effectively. However Task switching occurs when a CPU core is unable to manage the heavy load of a programme. However, excessive context switching will also increase CPU utilisation. It is crucial to effectively track and monitor the CPU as a result. You will learn how to check Ubuntu 18.04’s CPU usage in this tutorial.
Requirements
- 99rdp Linux VPS
- Access To Terminal
How to Monitor Processor Use in Ubuntu 18.04
An dynamic process viewer is htop. For Linux, there is a free (GPL) ncurses-based process monitor called htop. Similar to the top tool, but with the ability to scroll both vertically and horizontally, it enables you to see every process currently active on the system, along with its complete command line, as well as to view it as a process tree and select multiple processes at once. Process-related tasks (such as terminating and re-initializing) can be completed without supplying their PIDs.
Enter the specified code into the terminal to install htop.
# sudo apt install htop
Run the provided command to display the system’s current CPU usage after the installation procedure has finished.
# htop

mpstat – related data for report processors. The first available processor, designated as processor 0, is the one for which the mpstat command writes actions to standard output. Additionally mentioned are the processors’ overall average activities. On both SMP and UP computers, the mpstat command can be used, but on UP machines, only global average activities will be printed. The CPU utilisation report is the default report if no activity has been chosen.
Enter the specified code in the terminal to install mpstat.
# sudo apt install sysstat
Type the provided command after installing the utility to get a report for each running processor. The output from the “htop” command is identical when using the “mpstat” function, but it is presented more succinctly.
# mpstat

You can periodically take snapshots of CPU utilisation using the “mpstat” tool. mpstat “time” “snapshots,” for instance.
# mpstat 3 10

The command outputs the CPU utilisation every three seconds, repeating this for ten spans before generating a final average report.
vmstat – Stats about virtual RAM are reported. The following tool, despite its name, does more than just keep track of memory data. Processes, memory, paging, block IO, traps, storage activity, and CPU activity are all reported by vmstat. Averages since the last reboot are provided in the first summary generated. Additional accounts provide details on a length delay in the sampling interval. In either scenario, the procedure and memory reports are instantaneous.
To view the vmstat CPU summary, enter the command that is provided.
# vmstat

nmon -benchmarking utility, system administrator, and tuner. System administrator, tuning, and benchmarking utility nmon. The CPU, RAM, network, discs (mini graphs or numbers), file systems, NFS, top processes, resources (Linux version & processes), and on Power micro-partition details can all be seen on this screen.
Enter the specified code into the terminal to install nmon.
# sudo apt-get install nmon
Run the provided command after it has completed to verify usage.
# nmon

This will start the tool and show all the available choices. Press the letter c to examine CPU usage. Press C once more to go back. Press “h” for more choices. Press q to stop.

Conclusion
CPU workload is a measure of how much work the CPU is doing to manage operating system duties and process resources. This metric estimates the average CPU utilisation over time and is used to assess system efficiency. High CPU utilisation can be caused by a variety of things, so identifying the underlying cause is crucial if you want to lower it. This guide described numerous helpful commands and tools to assist users in monitoring and resolving their Ubuntu 18.04 CPU-related problems.
Read Our Next Articles How to Setup the Nginx Web Server on Ubuntu 18.04

by Sanjana Shruti | Feb 23, 2023 | Uncategorized
 Igor Sysoev created the Nginx [engine x] HTTP and reverse proxy server, mail proxy server, and general-purpose TCP/UDP proxy server. It has been active for a very long time on numerous heavily trafficked Russian websites, including Yandex, Mail.Ru, VK, and Rambler. As of December 2022, 21.25% of the busiest websites were hosted by or proxied by Nginx, according to Netcraft. Additionally, it can fulfil requests for static resources faster than Apache, enabling you to carefully balance requests, boost speed, and make better use of available resources. You can learn how to set up the Nginx web server on an Ubuntu 18.04 system by reading this tutorial.
- Root Access
- Terminal Access
- Server Running Ubuntu 18:04
Stages To SetUp Nginx Web Server on Ubuntu 18.04
- SSH into the server and use the provided command to update the preset repository.
# sudo apt update
- Run the provided command to install Nginx from the apt repository after the upgrade is complete.
# sudo apt install nginx
- Run the provided command to verify the Nginx process’s status after the installation is finished.
# sudo systemctl status nginx

If the Nginx process isn’t already operating, try starting it with the provided command. The output will produce information about the Nginx process.
# sudo systemctl start nginx
# service nginx start
If the Nginx process is not already running, this will initiate it.
# sudo systemctl stop nginx: Stops the Nginx service
# sudo systemctl enable nginx: Enables Nginx to load at startup
# sudo systemctl disable nginx: Prevents Nginx from loading at startup
Firewall Configuration for Nginx Data
You should modify the firewall programme to permit access to the Nginx service before trying Nginx. During installation, Nginx registers with ufw as a service, making it simple to give access to Nginx. Enter the provided command to create a list of the apps that the firewall allows.
# sudo ufw app list

Full: This profile opens both port 80 (normal, unencrypted web traffic) and port 443 (TLS/SSL encrypted traffic)
HTTP: This profile opens only port 80 (normal, unencrypted web traffic)
HTTPS: This profile opens only port 443 (TLS/SSL encrypted traffic)
The inventory of applications that have access to the firewall rules will be generated by this command. There are three Nginx profiles in the roster. For the purposes of this lesson, port 80 will only be open to the Nginx HTTP profile. To enable Nginx HTTP traffic from the firewall, type the provided command.
You can now assess the firewall’s condition. It ought to show a list of the traffic that is permitted for various applications.
# sudo ufw status

Nginx Web Browser Evaluation
Open a web browser, like Chrome, and type in the address box the IP address of your server. It will display the Nginx welcome page.

Conclusion
After setting up a web server, you have a wide range of choices for the content types you serve and the technologies you employ to produce more immersive experiences. This tutorial showed us how to set up the Nginx Web Server on Ubuntu 18.04. Please get in touch with us if you have any ideas or queries.
Read Our Next Articles Rust Installation Guide for Ubuntu 18.04