This article explains how to connect to a remote server under Linux using SSH. We also go through how to connect to a distant Linux server using PuTTY. PuTTY is not the only SSH client available for remote connections, of course. View this comparison of the top SSH clients for Windows in 2022, then pick the one that best suits your needs. It has long been necessary to access equipment remotely, and we can hardly conceive how life would be without the ability to control computers from a distance.
Depending on the operating system you’re using, there are a number of ways to connect to a remote machine, but the two most popular ones are:
Linux-based devices can use Secure Shell (SSH).
RDP is the Remote Desktop Protocol for Windows-based devices.
Both protocols make use of server and client software to establish remote connections. These tools give you access to and remote control over other computers, data transfer, and practically everything else you can do when physically in front of a computer.
What Does the SSH Stand for and What Is It?
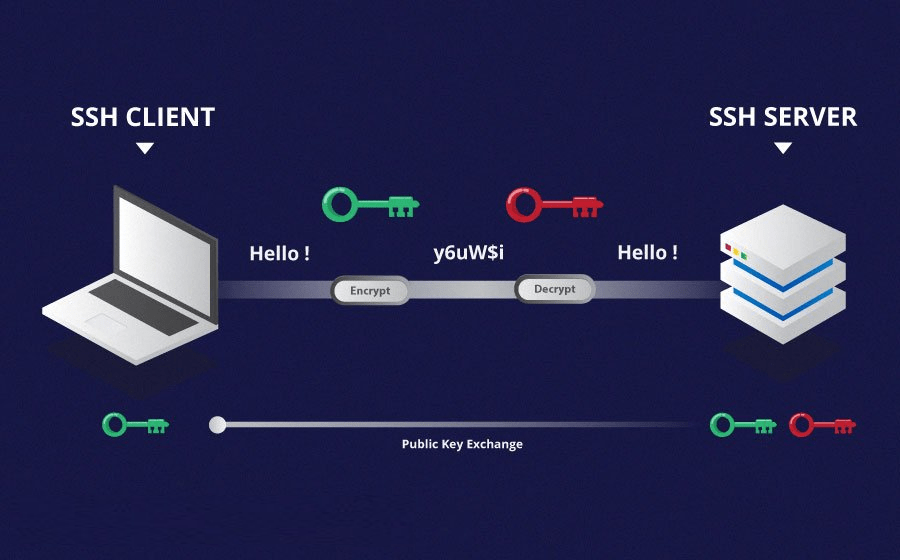
SSH (Secure Shell), sometimes known as “Secure Socket Shell,” is a protocol that enables secure text-based connections to servers or remote devices. SSH and RDP are the two most popular protocols for connecting to a distant system. A client and a server are required to establish an SSH connection.
Once a secure SSH connection has been established, a shell session will start, allowing you to issue commands through the local client to control the server. This protocol is used by system and network administrators in particular to access a device remotely in a very secure manner.
How Does SSH Function?
The client and the appropriate server-side component are required to establish an SSH connection. T When connecting to a different computer or server, an application called the SSH client is running on the device you’re using. The client establishes the connection using the information the remote host provides. The client establishes an encrypted connection when the credential has been verified.
The SSH daemon (SSHD), a component on the server, is always listening to a particular TCP/IP port for prospective client link requests. The SSH daemon will respond with the software and protocol versions it supports if a client has initiated a connection, and the two will exchange their unique identifiers.
The correct environment will be selected for a new SSH session if the received credential is correct. Version 2 of the SSH protocol is the standard for SSH server and SSH client communication.
How Do Terminals Work?
You should familiarise yourself with the terminal if you’re new to Linux. Consider it the ultimate command shortcut hub that serves as the default means of interacting with a Linux server.
Using the command line may appear to be a difficult task, but it’s easy if you start with the fundamentals, such as these 15 fundamental commands every user should be familiar with.
If you intend to create an application (or are learning to create one) using Python or PHP, the terminal becomes even more important. Linux incorporates Python and other programming languages into the terminal, in contrast to Windows, which messes up trying to reproduce Python with a GUI. Therefore, even though installing Python on Windows requires a few steps only to result in a jumbled mess, Linux already has it installed and is command-line accessible.
Describe SSL.
Secure Socket Layer, or SSL, is a protocol that SSH employs to encrypt data sent between a web browser and a server. With SSL, the connection between a web server and a browser is encrypted, guaranteeing the privacy and security of any data exchanged between them. In other words, the SSL security protocol includes the creation of public and private keys between remote servers and local PCs connected via SSH. This additional degree of security is beneficial, especially when dealing with brute-force password attempts.
How can I establish an SSH connection?
You must ensure that both the client and the server components are installed on both the local and remote machines in order to establish an SSH connection.
OpenSSH is a widely used and user-friendly open-source SSH utility for Linux distributions. It requires access to both the connecting device and the server’s terminal. Please be aware that an SSH server is not installed by default on Ubuntu. We now have a solid understanding of SSH and topics that are related to it, so let’s get started on setting up an OpenSSH client.
STEP1- Setup the OpenSSH client
Make sure the SSH client is not already installed on your machine before installing it. SSH clients are already included in many Linux distributions.
1.Run the following command to install OpenSSH on your device:
sudo apt-get install openssh-client
2.Once necessary, enter the superuser password. 3.To complete the installation, press Enter.
STEP2-:Install an OpenSSH Server
The server-side component of the SSH software toolkit must be installed on the computer in order for it to accept SSH connections. The steps below must be followed in order to accomplish this:
1.Launch the server machine’s terminal. Either find a terminal or use the keyboard shortcut CTRL + ALT + T.
2.To set up your SSH server, type the following command:
sudo apt-get install openssh-server
3.Once necessary, enter the superuser password.
4.After the disc space prompt, hit Enter and Y to let the installation proceed.
You can check whether the SSH server is operating on the machine by executing the following command after you have completed the aforementioned procedures and have the necessary support files installed for you:
sudo service ssh status
If the SSH service is functioning as intended, the terminal response ought to like this exactly:
Another approach to know if the OpenSSH server is installed correctly and will accept connections is to rerun the ssh localhost command in your terminal prompt. The response will look similar to this screen when you run the command for the first time:
Now, enter yes or y to continue.
Well done! Your server is now prepared to accept SSH remote connection requests coming from an SSH client on another computer.
How can I connect a Linux computer to a remote server using SSH?
The following procedures can be used to establish a secure SSH remote connection to your servers once you have installed OpenSSH on every device you require:
1.Run the following command if the username on your local device and the server you plan to connect to match:
ssh your_username@host_ip_address
You can use the following command if the username on your local device and the server you plan to connect to match:
ssh host_ip_address
And press Enter
2.Press Enter after entering your password. Keep in mind that typing will not result in any feedback appearing on the screen. Make sure your password is kept safely and not in a text file if you paste it. 3.You will be prompted to continue connecting after your initial connection to a server. Simply enter “yes” after you type it. Only this time would this message show since your local computer does not recognise the remote server.
4.You have now connected to the remote server and added the ECDSA fingerprint key.
It is better to utilise the private IP address rather than the public IP address if the device you are trying to remotely link to is on the same network. If not, all you’d need to use is the public IP address. Now, you may use your terminal to manage and operate a remote device. Check that the IP address of the remote device, your username, and your password are all accurate if you’re having problems connecting to a remote server. Moreover, confirm that a firewall is not blocking or improperly forwarding the port the SSH daemon is listening to.
Additional developments in remote control SSH
We strongly advise taking a few further actions to strengthen the remote control SSH and its security once you have established an SSH remote connection to your server. Because using default values for ssh remote connection setup makes your system more vulnerable to hacking and invasions, making SSH access in general unsafe and making your system a target of automated attacks.
The sshd configuration file can be modified to include the following tips for enhancing SSH security:
Make changes to the SSH daemon’s default TCP port and Change 22 to a significantly larger number, say 245976. Be careful not to use port numbers that are simple to guess, such 222, 2222, or 22222.
For password-free SSH login authentication, use SSH key pairs. They provide you a quicker and more convenient method and make it safer to log in without requiring a password.
On your server, disable password-based logins. Because Disabling this will prevent anyone from using your password to log onto your servers if it is cracked. It is vital to confirm that key pair authentication functions properly prior to doing so.
Use the su – command to disable root access to your server and use a regular account (to switch to a root user).
Our understanding of SSH remote connections and remote SSH access has improved. In this post, PuTTy was mentioned several times; if you are unfamiliar with PuTTy, you probably have some queries about it. As a result, in addition to providing SSH remote connection instructions, we will also describe PuTTy and demonstrate how to use it to connect to a Linux server.
What Is PuTTY?
Popular Windows terminal emulator PuTTY is available for other operating systems as well. PuTTy provides a text user interface for remote computers running any of its supported protocols, including SSH and Telnet, and is free and open-source, making it popular with Linux users as well.
NOTE- PuTTY is free to download software and offers a simple way to access the Unix shell environment from your windows system. Unlike Unix, Windows does not have a pre-installed SSH server or client. That is why the network file transfer program supports a variety of protocols, including Telnet clients.
How to Use PuTTY to Connect to a Linux Server?
After installing PuTTY, follow these instructions to connect to a Linux server using it:
STEP1-Prepare PuTTY
When you start PuTTY, the primary session configuration screen will appear. Start by entering the server’s Host Name (or IP address) to establish a connection.
As 22 is the most used port for SSH on servers, the port will be set to 22 by default, which creates a vulnerability because hackers will know which port to attack by default. Use these instructions to modify the SSH port, and then modify the number in PuTTY. Ensure that SSH is selected as the connection type.
Let’s say you don’t save your settings for future usage and don’t connect to your server using a private key. In such instance, click Open to enable an SSH connection to your server right away that authenticates with your password for the account.
If this is your first time connecting to your server, PuTTY will display a Security Warning to inform you that it lacks a key in the server’s registry. For your initial connection, it’s typical.
You will be prompted for your password if the connection is successful. Once you’ve done that, your server’s shell will now be accessible to you.
STEP2- Save the PuTTY Configuration for Next Times
To spare you from having to input everything every time, PuTTY lets you preserve the configuration you use to connect to a server. Make sure you are on the primary session setting screen mentioned above once you have completed all the required fields and are prepared to connect.
You can view your server’s hostname and port number. In the text field next to Saved Sessions, type the name of the SSH session configuration you want to store, then click Save.
How do I configure Linux for SSH public key authentication?
SSH keys can also be specified to use in PuTTY. SSH keys are a safer and occasionally more practical form of authentication. They can be created using PuTTY itself. Here is our approach on creating SSH keys on Windows with PuTTY. It can be used to swiftly strengthen your SSH security.
Setting up public-key authentication over SSH on a Linux (or macOS) computer requires the following actions:
Step 1: Generate a key pair
In order to create a key pair using the RSA algorithm, first log in to the computer you’ll use to access the remote host. Then, use the command line SSH to create the key pair. Enter the following command into the command line to produce RSA keys.
ssh-keygen -t rsa
Step2:provide the filename and password
The key pair must be saved in a file, and your private key must be password-protected. Click Enter or Return without specifying a filename if you want to keep using the key pair’s default filename and location. As an alternative, you can put a filename at the prompt like My ssh key and hit Enter or Return. A lot of remote hosts provide the option to accept private keys with the default filename and directory, so take note of this. As a result, you must specifically execute this on the SSH command line or in a /.ssh/config file for the SSH client.
A password with at least five characters must be entered, and you must then press Enter or Return. Your private key will be generated without password protection if you click Enter without first entering a password.
Step 3: Copy public key
To copy the public key file to your account on the remote system, use SFTP or SCP.
Step 4:Type in your login information.
Your account password will now be requested from you. Your public key will be copied to your home directory and kept on the remote system with the exact same filename.
Step 5: Login to the remote system
Log in to the remote system with your account username and password
Step 6: Create the required document on your account.
If the /.ssh/authorized keys file for your account on the remote system does not already exist, create it by entering the commands below:
mkdir -p ~/.ssh
touch ~/.ssh/authorized_keys
Step 7: Add the information in the public key file to the authorized-keys file.
Use the command below to add a new line to your /.ssh/authorized keys file on the remote machine with the contents of your public key file, such as /id rsa.pub:
cat ~/id_rsa.pub >> ~/.ssh/authorized_keys
If your public key was properly added using the command listed below, you might wish to examine the data in /.ssh/authorized keys:
more ~/.ssh/authorized_keys
Step 8: Remove the public key file
Using the following command line syntax, you may now securely delete the public key file from your account on the remote system:
rm ~/id_rsa.pub
Alternatively, you may use the following command to transfer your public key to your.ssh directory if you prefer to keep a copy of it on the remote system:
mv ~/id_rsa.pub ~/.ssh/
Step 9: Add other systems with your public key (Optional)
Repeating these procedures at this point will add your public key to any further remote systems you choose to connect to from the computer using your private key and SSH public key authentication.
Step 10: SSH to the remote system using your account
Now that you have your private key on a distant system, you should be able to take advantage of SSH remote connections using that account. If you need to enter a password or passphrase to access your private key, the remote system will prompt you (like the picture below). Be careful not to send your private key passphrase or password to the remote system.
The remote system will bring you to the command line in your home directory without requesting a password or passphrase if your private key is not password-protected, and you will see output that looks like this:
Connect by selecting the Open tab and providing the password.
You can control a system from a distance using a variety of remote desktop applications in addition to SSH remote connections. Let’s talk about these instruments in brief.
Essential remote desktop protocols
The two remote desktop protocols, VNC and RDP, have comparable objectives but use different approaches.
Describe VNC.
Virtual network computing, or VNC, is occasionally mistaken with VPN, or virtual private network. In the peer-to-peer networking setting, which enables remote access to a computer, they both carry out the same functions. They aren’t quite the same, though.
VNC provides full device access via desktop sharing programmes that let you take complete remote control of your computer. Productivity is enhanced for all parties involved, including IT personnel, businesses, and individual users, through remote desktop capabilities.
In contrast, a VPN provides remote access to the network rather than the machine itself, so you can only access shared data and resources, like a shared printer at work.
VNC over SSH tunnel
The Virtual Network Computing (VNC) protocol cannot be used to establish a secure connection to a remote desktop. After the initial sign-in, some VNC clients do not protect your connection. To get around the issue, you can tunnel a VNC connection over a Safe Shell (SSH) tunnel. When the standard VNC port (port 5901) is blocked, the SSH tunnel offers a secure VNC connection that enables you to use VNC connections.
For further security, some corporate networks will restrict common ports like port 5901, therefore using VNC via SSH will allow you to get around this problem.
Describe RDP.
Microsoft developed the Remote Desktop Protocol (RDP), a network communication standard that enables users to connect remotely to other devices. T.120 protocols, or “regular protocols,” are an extension of the ITU’s Remote Desktop Protocol (International Telecommunications Union).
SSH Remote Connection, a last consideration
The client and the equivalent server-side element are required as two components to establish an SSH remote connection and utilise it to connect a server under Linux. This how-to article described how to exploit SSH’s advantages and gain remote access to it. To help you take full advantage of Linux’s amazing attributes, we are also pleased to offer a variety of Linux VPS plans. At cloudzy, we strive to offer you the best Linux VPS solutions possible so that the service you choose has good security and performance and provides you with an unparalleled hosting experience.
FAQ
Describe SSH.
The SSH protocol is used to connect securely to remote servers. This protocol is used by the ssh command to transmit encrypted data between the client and the host.
How do I configure SSH keys?
Produce SSH Keys
Name your SSH keys.
Type a password in (optional)
Move the remote system’s public key across to it.
Examine your connection.
Describe SSH key pair.
A public key and a private key are the two keys that make up each SSH key pair. Data can be encrypted by anybody who has a copy of the public key, but only the owner of the associated private key can decrypt the data.
SSH and Telnet are both network protocols made for managing and gaining access to remote computers. When should we choose one over the other and how do they differ from one another? In this post, we’ll compare Telnet with SSH and discuss the pros and cons of each. Before delving into the specifics of Telnet vs. SSH, it is important to understand both protocols better.
Describe Telnet.
Terminal Network, or “Telnet,” is a term that is almost as old as the internet. The common TCP/IP protocol called Telnet was created for virtual terminal services. You can connect to a remote system in a way that makes it seem like a local system by using Telnet. Telnet is a network protocol that permits virtual computer access and offers two-way, group text-based communication between two systems.
Describe SSH.
A network protocol called SSH (Secure Shell), commonly referred to as Secure Socket Shell, gives users, particularly system administrators, a secure way to access a computer across an unprotected network. You can use SSH to encrypt data transmissions between two computers connected over an open network in addition to robust password and public key authentication. Simply put, the SSH protocol can encrypt traffic going both ways, assisting you in avoiding problems like trafficking, sniffing, password theft, and others.
SSH is also commonly used by network administrators to remotely manage a variety of systems and applications. Network administrators can use this SSH functionality to connect in to another computer remotely, run commands, and transfer files between computers. Knowing these protocols now will help us in the section that follows when we talk about the comparison between Telnet and SSH.
What are the primary distinctions between SSH and Telnet?
Even though Telnet and SSH share certain similarities, both protocols can be distinguished by their significant differences. SSH is more secure than Telnet, which is the main difference between the two. Because of this, we may assert that SSH has largely replaced Telnet in all services. In light of this, let’s compare Telnet and SSH in more depth.
Telnet and SSH comparison:
Even their definitions differ when Telnet and SSH are compared. The networking protocol known as Telnet, which stands for Telecommunications and Networks, is mostly used on the UNIX operating system. SSH, or Secure Shell, is a cryptographic network protocol that allows for the secure operation of network services across an unprotected network. SSH let you transfer files between systems, log into a distant computer over a network, and run commands on that computer.
To handle the distant system using Telnet, a server programme must be installed on it. Additionally, the client application needs to be installed on the local PC. TCP protocol and port 23 are utilised to make it feasible for you to connect to a remote machine via Telnet. After that, this machine can receive commands and perform the role of a Telnet server. Commands are sent using the NVT (Network Virtual Terminal) format. The server will then take these commands in, interpret them, and send them to the correct application.
Operation: Telnet vs. SSH
To handle the distant system using Telnet, a server programme must be installed on it. Additionally, the client application needs to be installed on the local PC. TCP protocol and port 23 are utilised to make it feasible for you to connect to a remote machine via Telnet. After that, this machine can receive commands and perform the role of a Telnet server. Commands are sent using the NVT (Network Virtual Terminal) format. The server will then take these commands in, interpret them, and send them to the correct application.
SSH, on the other hand, uses port 22 to give you a secure connection to the server (note that you can change the port number). Since SSH employs key-based authentication, as you may be aware, a session key is generated and delivered to both the client and the server after the client has verified the server. This key encrypts the session’s traffic. The client authentication procedure is concluded by the server authenticating the client using a produced SSH key pair. We created an encrypted connection by following these procedures, allowing the two systems to safely share data.
SSH vs. Telnet: Security
Telnet is quite insecure because it doesn’t employ any security procedures when transferring data. Therefore, it is dangerous to use this protocol unless we use Telnet on private and trusted networks. The opposite is true with SSH sessions, which use paired keys for authentication. As you may imagine, this method makes it very difficult to decode and read the transmitted data. SSH is therefore regarded as a very secure method of sending data over insecure networks.
Authentication in Telnet vs. SSH
Telnet provides no methods for connection establishment that need authentication. However, the most popular and secure SSH authentication method used by SSH is public-key encryption. The client holds the private key after the creation of the SSH key pair. The public key is transmitted to a server in the interim. When a client wants to connect to a server using SSH, the server verifies the client’s identity by comparing the client’s public and private keys. Two systems can link securely if their keys are same.
SSH vs. Telnet: Data Format
Using the Network Virtual Terminal format, Telnet can only send data in plain text; in contrast, SSH can encrypt information going both ways. SSH uses a secure channel in addition to an encrypted format for data transmission.
Use cases of SSH vs. Telnet
SSH is useful for practically all use cases and is especially beneficial for public networks because it is far more secure than Telnet. SSH provides more features, such as secure file transmission and port forwarding, than Telnet. However, in the following two circumstances, Telnet is advised over SSH:
You can use Telnet to access secure, private networks, such LANs.
When utilising non-SSH capable devices
Telnet’s lack of security is no longer a problem under these circumstances, and the reduced bandwidth utilisation is also advantageous. In this part, we compared Telnet and SSH from several perspectives. You will become familiar with their key benefits and drawbacks in the paragraph that follows.
What benefits and drawbacks does Telnet offer?
We’ve listed some of Telnet’s advantages and disadvantages below.
Advantages of Telnet
The Telnet protocol can be helpful for trouble-free information sending and receiving.
A network virtual terminal is implemented by all terminal network clients and servers (NVT).
Almost all types of operating systems support Telnet.
This protocol can save a lot of time because you don’t need to physically visit any hosts.
Telnet is incredibly adaptable, so you can easily install it on any system.
Negative aspects of Telnet
Security hazards might result from unencrypted data transmission using Telnet.
Given that Telnet is a character-based communication method, GUI-based tools cannot be used through Telnet connections. Additionally, it is not possible to send mouse movements or other GUI data.
Because Telnet is not secure, hackers can access information like usernames and passwords.
Telnet can have several weaknesses, as we discussed in this part, so Secure Shell was developed in the middle of the 1990s to ensure safety and security.
What SSH benefits and drawbacks are there?
Of course, SSH is more secure than Telnet; However, SSH has its pros and cons.
Advantages of SSH
Data encryption is possible using SSH, preventing hackers and attackers from accessing user data and passwords. SSH additionally enables the tunnelling of other protocols, such as FTP. The following are some of the issues that SSH can shield you from:
Source-routing IP
Source routing frequently serves beneficial reasons, such as changing a network signal’s path. However, if it doesn’t work, it might also be tricked by malevolent users, leading a system to believe it is speaking to a different machine.
DNS Spoofing
In a hacking operation known as DNS spoofing, malicious Domain Name System data is inserted into the server’s cache database. By returning an inaccurate IP address as a result of this DNS cache poisoning, the name server sends traffic to a different machine. Attackers have access to sensitive data through their computers.
Manipulating data
The attacker can collect or alter data at intermediaries along with the network route. This problem frequently happens at routers, which act as a form of gateway or checkpoint for data travelling to their destination.
Sniffing or listening to sent data
An attacker can monitor your data and gather any private or sensitive information if you are using an unprotected connection for their malevolent purposes.
IP address forgery
Making Internet Protocol (IP) packets with a bogus source IP address is known as IP address spoofing. The source’s location and identity are concealed in this manner, allowing the attacker to mimic them by using a different computing machine.
Disadvantages of SSH
Added preparation time compared to Telnet.
SSH lacks a built-in GUI.
SSH usage calls for additional technical expertise.
You can read this post to learn more about the best SSH client for Windows after reading the comparison between Telnet and SSH. You might have another query in mind. How can we set up a line on a terminal server or router?
What is Telnet transport input SSH?
You can remote access devices via the virtual terminal (VTY) lines. You can select which protocols are permitted access to the virtual terminal lines using the Cisco “transport input” command. The following transport input command keywords will allow you to set the permitted protocols on the VTY lines.
ssh: allows TCP/IP SSH protocol only
telnet: allows TCP/IP Telnet protocol only
all: allows all protocols
none: blocks all protocols
telnet ssh: allows both Telnet and SSH protocols
Additional Telnet commands
This list includes some of the Telnet commands:
Open-To connect to a host using Telnet, open the port specified by the hostname.
Close-aids in terminating an active Telnet connection
Quit: to exit from Telnet
Status-figuring out whether or not the Telnet client is connected.
Timing Mark– Describes timing Mark
Terminal Type/Speed: Setting the terminal type and speed
Other SSH Commands
Here are some useful SSH commands:
Is-Display the directory’s content
Cd-assisting with directory change
mkdir-you make a brand-new folder (directory)
touch-letting you delete a file.
In today’s IT and DevOps businesses, remote connections to server infrastructure are commonplace. But there are a few good options to take into account when selecting an authentication protocol. The Windows Remote Desktop Protocol (RDP) and SSH are two protocols that come to mind.
This article’s earlier sections compared Telnet and SSH from a variety of angles. Here is a comparison between RDP and SSH so that you can make an informed decision. But first, do you know what RDP is before we compare these two protocols?
Describe RDP.
Only physical Windows servers and Windows virtual machines (VMs) can be accessed using the Remote Desktop Protocol. RDP may give you, the user, a Windows Graphical User Interface (GUI) experience, which increases the usability of servers for many workers, even if they lack technical knowledge. In this respect, we take pride in being able to provide our clients with the most dependable, high-performance RDP servers, with a 99.95% uptime. By clicking the link below, you can compare the top RDP Servers with ease.
Conclusion
Telnet and SSH are two network protocols that can be used to remotely access and control devices. Telnet is still helpful in some circumstances, even if SSH protocol is the superior choice. It’s crucial to keep in mind that the primary distinction between SSH and Telnet is that SSH encrypts all data, including usernames and passwords, throughout travel in both ways. Additionally, purchasing RDP is an option if you prefer a GUI experience. When using RDP, you can connect to another computer via a network using a graphical interface.
FAQ
Why was Telnet replaced by SSH?
Telnet has a secure substitute in SSH. This protocol can defend against eavesdropping attempts and secure user identities, passwords, and data.
Is Telnet a threat to security?
Telnet submissions of credentials (usernames and passwords) are not secured, leaving them susceptible to identity theft.
Is Telnet a security risk?
Telnet submissions of credentials (usernames and passwords) are not secured, leaving them susceptible to identity theft.
Is SSH faster than Telnet?
Since there is no key exchange or encryption, the Telnet protocol is quicker.
What distinguishes SSH and RDP from one another?
Both can be used to connect remotely to computers and other servers, but RDP’s GUI design makes it more user-friendly for non-technical staff members.
It can be difficult to choose the finest SSH client for the Windows operating system. One of the most widely used protocols for remote connections is SSH (Secure Socket Shell). People connect to their remote servers using SSH for a variety of reasons. It’s the primary method for setting up your gaming server, web hosting, and other services, adjusting Remote Desktop, and more. SSH aids in creating a tunnel so that private information can be safely transferred from an unprotected Internet connection to a secure connection. The SSH client is a piece of software that connects to remote systems using the SSH protocol. The best SSH client for Windows in 2022 will be determined by comparing the top 10 contenders in this article.
What is SSH, exactly?
The finest SSH client for Windows is the primary topic of this essay. It might also be simpler if you are familiar with the SSH protocol’s fundamentals and the encryption mechanism it uses. As you may already be aware, Secure Shell (SSH) is one of the greatest cryptographic network protocols for strengthening the security and dependability of an unreliable network. Standard applications like remote command execution, remote command-line access, and remote desktops can all be secured with SSH. However, this protocol can be used to secure any online activity. In order to achieve this security, a tunnel will be created and encrypted. This tunnel will connect using SSH client software and a client-server architecture.
There are a few SSH clients for different operating systems, even though SSH is typically used to access Unix-like operating systems (like the majority of Linux distributions). Therefore, a Windows SSH client is available (Windows 10 uses OpenSSH as a default SSH server and client). So let’s get started by introducing and contrasting the top SSH clients for Windows candidates.
Top 10 SSH Clients Compete to Be the Best Windows SSH Client
The primary goal of this post is to introduce the finest SSH client for Windows. If you are familiar with the fundamentals of the SSH protocol and the encryption mechanism at work therein, however, it might also be easier for you. As you probably already know, one of the best cryptographic network protocols for making an unreliable network more trustworthy is Secure Shell (SSH). Standard applications like remote command execution, remote command-line access, and remote desktops can all be secured with SSH. However, this protocol can be used to secure any online activity. In order to achieve this security, a tunnel will be created and encrypted. This tunnel will connect using SSH client software and a client-server architecture.
There are a few SSH clients for different operating systems, even though SSH is typically used to access Unix-like operating systems (like the majority of Linux distributions). That implies you can utilise the Windows SSH client (Windows 10 uses OpenSSH as a default SSH server and client). So let’s begin by outlining and contrasting the potential candidates for the best SSH client for Windows in 2022.
One of the top SSH clients for Windows in our SSH clients category is MobaXterm. For network administrators that need to access UNIX-based systems like Solaris, HP-UX, and others like them, it is the perfect client. It is the same as connecting to PuTTY to connect to MobaXterm. Nevertheless, it contains additional features including an inbuilt X server and compatibility for more external protocols (e.g., FTP, SFTP, RDP, Telnet, VNC, XDMCP, rlogin). In 2022, MobaXterm will be the ideal SSH client for Windows 10. The following is a list of some of this SSH client’s positive attributes:
Features:
Establish sessions using SSH, RDP, FTP, XDMCP, VNC, rlogin, Telnet, or Serial.
Remote Unix Desktop with Graphical SFTP Browser and XDMCP Protocol SSH Tunnel for Port Forwarding
Execute Unix commands.
The choice to download necessary files and use plug-ins to start remote sessions
X11 Server with automatic session saving to protect your work
X.org-based Multi-Execution Enhanced x Extensions
Embedded Tools and Servers
Embedded Text Editor for Remotely Editing Remote Files
Downloading and Using Unix Tools is an Option Using the MobaXterm Terminal Customizer’s MobApt Package Manager Password Management Recording Macros
Simon Tatham created Putty, a telnet and SSH client for Windows and other operating systems. To learn how SSH differs from Telnet, you may also read this article. This is a serial console, terminal emulator, and network file transfer programme that is open-source and free. It supports a number of network protocols, including SSH, SCP, raw socket connection, rlogin, and Telnet. The following are some of PuTTY’s most notable features:
Features:
Controlling the SSH encryption key enables the use of different remote desktop terminals and alternative cyphers including DES, Blowfish, AES, RC4, and public key.
Through GSSAPI Port Forwarding, SSO Support (Remote, Local, and Dynamic) SCP and SFTP clients provide command-line file transfers over SSH for IPv6.
The best SSH client for Windows 10 and older Windows versions is mRemoteNG. With the help of this open-source client, a remote connection can be established quickly. It is made available under the General Public License (GNU). You can use a tabbed interface with the multi-protocol remote connection manager mRemoteNG to make your tasks easier. These are a some of the positive attributes of these SSH clients:
Features:
Without charge
Support for Open-Source Released Under the GNU License Support for Multiple Protocols Several Sessions
Importing Connections from Active Directory is Simple to Organize
File Transfer Assistance
The choice to take screenshots of active connections
Automatic External Tool Updates
Fast Connect Port Scan
Credentials Can Be Stored on a Lightweight Device for Later Use
Another excellent option if you’re looking for a flexible and user-friendly SSH client is WinSCP. WinSCP specialises in file transfers and employs a variety of clients, like SFTP and FTP, to enable you to copy and paste files effortlessly and flawlessly between the two devices, in contrast to some other SSH clients that offer you all-in-one services to manage your SSH connection. In addition to using the SSH protocol generally, it also supports and makes use of the FRPS, SFTP, WebDAV, S3, and SCP file sharing protocols.
ZOC is a terminal emulator and Windows and Mac OS SSH client. This open SSH-based programme includes capabilities including Key Exchange, Authentication, Encryption, Static Port, Dynamic Port, SSH Connection via Proxy, SSH Agent Forwarding, and X11 Forwarding. ZOC is a reliable and stylish application with strong functionality and a substantial number of emulators. It will help you establish secure shell, Telnet, serial cable, and other connections to hosts and mainframes. Among the commercial SSH clients for Windows, ZOC terminals provide four different licencing options: licence for ZOC7 ($79.99), upgrade from a prior version to ZOC7 ($29.99), site licence ($11998.50), and 500 or more users (Get a quote). You can find the costs for its other products, such as MacroPhone, PyroBatchFTP, and Mailbell.
Features:
Transfer of SCP files
a robust SSH connection that is appropriate for low-end networks
Developers and system administrators will use terminals to regularly connect to Linux servers from Windows computers. It is open to Telnet, SSH, RDP, VNC, and RAS connections. The user interface is tabbed. You will be able to save the login name and password for distant servers, enabling one-click connection. You can establish a collection of servers in Terminals and connect to them all with a single click. It is possible to save multiple user credentials for the same server. With these characteristics, Terminal is a fantastic and simple-to-install tool for companies that depend on multi-user SSH operations.
Features:
Due to open-source, there are great features and advancements.
Integrated screenshot tool
support for a variety of protocols, including Telnet, RDP, VNC, VMRC, and SSH.
enables you to fast rejoin by using your saved data to quickly re-connect to past connections.
To replace the outdated PuTTY, SolarWinds created SolarPuTTY. Only an open SSH session to distant devices is being upgraded. SolarPutty is the ideal client for Windows if you want to connect your servers, routers, switches, and other components over SSH.
Features:
Support for SSH, Telnet, SFTP, and SCP
Permit remote sessions to be saved
Sessions for Import / Export
Automatic Reconnection in the Event of an Interruption
Using a single console to Manage Multiple Sessions
Support for a dedicated search bar Access Scripts
Integrate Credential Login With Windows Free of Charge
SmarTTY is another SSH contender for the best SSH client for Windows. A free SSH client with several tabs that can simulate the SSH terminal is called SmarTTY. It is an excellent SSH client for Windows 10 and older versions and only operates on Windows.
Features:
Excellent Replacement For PuTTY Regular Updates
Several Sessions Encourage public key authentication.
Multi-Tab SSH Sub-Session In A Single Session
Making File Copies and Transfers Using SCP
Xming and Terminals Included
GUI File Panel for Smart Terminal Package Management
Another SSH client that prioritises speed and simplicity is Bitvise SSH. Bitvise offers a one-click installation that is extremely quick. After completing this procedure, you will have access to your own configurable SSH client that enables SFTP file transfers in a graphical interface. Overall, Bitvise SSH is a fairly simple SSH client to instal and use, and it includes all the tools found in the more well-known SSH clients for Windows. It offers top-tier OS integration with Windows and supports all Windows versions starting with Windows XP SP3.
Features:
Integrated Reconnection
Outstanding SFTP graphical file transfer security features file encryption
Excellent for SSH port forwarding FTP to SFTP bridge, allowing you to use SFTP even with more dated FTP programmes
Access to terminals with support for UTF, VT-100, and Xtreme
Version on the go
highly adaptable Execution of remote commands
suitable for a variety of Windows versions
Support for public key authentication using RSA, DSA, and ECDSA with thorough user keypair management.
An SSH client based on PuTTY 0.71 is called KiTTY. You can instantly connect to telnet, ssh-1, and ssh-2 servers with the help of its automated password feature. In this scenario, the password value will be encrypted. A port knocking sequence can be handled by KiTTY. Both Internet Explorer and other browsers, such Firefox, support KiTTY.
The source code of PuTTY was copied and modified to create KiTTY. By writing scripts, you’ll be able to log in automatically. On the command line of the remote computer, you will be able to run commands.
It has a text editor, a chat feature, and keyboard shortcuts for pre-defined commands.
Features:
Version portable of the session filter
support for scripts written locally
Repetitive sessions
Windows PuTTY fork is tightly integrated with it, and it includes its tools and more.
support for various keyboard configurations
Encouragement of the Talent protocol
Choosing the Best: Which Windows SSH Client Is Right for You?
Strong candidates were competing against each other in a difficult race. However, there comes a moment when you must decide which SSH client to instal on your Windows machine, and there is only one solution (admittedly, the question is not as dramatic as “is Debian better than Ubuntu,” but it does come up). The fundamental question is whether you want your SSH client to support distant connections using non-SSH protocols as well. Do you think it needs a password manager? Are you prepared to make a purchase? You can choose one of these 10 options by responding to questions like these because they all include the features you would expect from an SSH client and more.
more But in my opinion, the greatest SSH client for Windows in 2022 is still the plain old PuTTY. It is quick, efficient, and doesn’t require a lot of resources because it doesn’t perform anything fancy. Other SSH clients, including numerous forks of PuTTY itself, have emerged to contend with PuTTY. However, it will still be the best overall in 2022. Since it can be challenging to keep track of the qualities of 10 contenders for the finest SSH client for Windows, we will create a table below to make it simpler for you to do so.
Conclusion
Let’s say you’ve chosen the greatest SSH client and are satisfied with it; are you then finished? Can you vouch for your security? not before determining whether the SSH connection on the other end is secure! There are always two ends to a tunnel, and even if it is secure and airtight, what happens at one end can undermine all of your security measures.
Therefore, choosing the best server hosting company is crucial. There is no use in using SSH if the supplier isn’t security-conscious. Cloudzy takes pride in its high-security features, which include a hardware- and AI-powered firewall, intelligent DDoS defence, and other in-house developed technology. Check out our Linux VPS plans, which include 15 distinct locations, access to well-known distributions like Ubuntu and Debian, 99.95% uptime, low latency, 24/7 customer support, a 7-day money-back guarantee, and premier VPS services and server-side security that you can rely on.
FAQ
Which SSH client for Windows 11 is the best?
Even though we had named PuTTY as the overall winner of the best SSH client for Windows in this post, PuTTY, like many other options, hasn’t been the option that has adapted the quickest. When it comes to Windows 11, Solar PuTTY, a branch of PuTTY, is known to provide the finest performance.
Is SSH equivalent to RDP?
No. Despite the fact that they are both remote access protocols, they take very different approaches to the problem. The primary distinction is that RDP, created by Microsoft, supports Graphical User Interfaces (GUI), which makes it superior to SSH for some applications like online trading. Still, because to its lesser hardware burden, SSH performs better than RDP in jobs like VPN and VPS hosting.
Is There a Default SSH Client for Windows?
Yes. Windows comes with a built-in SSH client that can be used from Windows Terminal. Even though Microsoft’s built-in terminal is functional and adequate for many tasks, it is preferable to use one of the clients mentioned in this article if your tasks require more complex details, more advanced hardware, or a more complex network setup because they are simply more integrated and more effective.
The most crucial and initial step after designing and setting up a WordPress site should be taken in the area of security. Although Word Press is one of the most well-known and unquestionably the best content management systems (CMS), it has attempted to improve the security of its platform by providing regular updates and has been able to provide users with as much security as possible, but in the Various layers of updates it has encountered errors and bugs.
On the other hand, WordPress is more vulnerable to hacking and intrusion because of its popularity among users and because it has become the primary choice of businesses to utilise and host websites. You run the risk of unintentionally compromising the protection of your WordPress site from assaults and security threats if you are neglectful in applying basic security methods to boost WordPress security.
As a result, site owners must work to strengthen the security of WordPress sites because, if hackers gain access to and gain access to your site, in addition to stealing sensitive data from it, they may also harm your reputation and brand. Additionally, if your site’s audience learns about your security flaws, they may lose trust in you and stop using the service or purchasing the product you offer.
As a result, if your website is a valuable asset, you should take precautions to improve its security and lower the likelihood of invasions and attacks in order to avoid unpleasant situations and safeguard your data from theft. Although no tool, plugin, or action will completely ensure the security of your website, it can reduce the dangers. How to boost WordPress security to keep the site secure is a difficult problem for many users.
We’ve chosen to address the most crucial problem for WordPress sites in this article and offer doable, straightforward methods to improve WordPress security. So stay with us till the article’s conclusion.
The importance of site security
Increasing and upgrading the site’s security should be a top priority because website hacking seriously damages organisations’ revenue and reputation. We shall list a few factors that make site security crucial, including:
To safeguard your private data
When a hacker infiltrates a website, access to sensitive information about the site’s audience and visitors is granted to the hacker. This can result in identity theft, data leakage, the installation of malicious software, the exploitation of audiences and users due to access to sensitive information, the spread of malware among users, and other negative effects.They might even extort some users who need to pay the ransomware in order to get back access to their website. More than 50 million users have been exposed to phishing, information theft, or malware via accessing websites, according to a Google release from March 2016.
Additionally, Google blacklists roughly 50,000 websites for phishing and 20,000 websites for malware every week. It goes without saying that going through these things will hurt the development and reputation of your website and business and require you to invest time, money, and effort.
Enhancing the site’s security in order to win the audience’s trust
They and difficulties that need to be resolved will multiply as your website and business expand, and customers’ expectations of how problems will be handled will rise as well. One of the crucial challenges requiring action to enhance site security is keeping the information about your clients secure. Customers will be sceptical of your website and services if you don’t implement security measures right away.
If your audience doesn’t trust the management of your website to disclose sensitive information like contact details and payment information (which necessitates PCI compliance) or to take part in surveys, they won’t interact with your site, which will be detrimental to your business in every way. As a result, it’s important to provide security on your WordPress site in order to win your consumers’ trust.
The significance of site security for Google
The security of your WordPress site is one of the most crucial factors used by Google to evaluate websites and determine where it should rank them. Enhancing the security of your website can have a significant impact on search engine results. The security of the website and user data should therefore be a top priority.
How safe is WordPress?
WordPress is a well-known and secure content management system. However, like any other cms, it might be vulnerable and its security is not 100% guaranteed because WordPress sites are frequently targeted for hacking due to its 42.7% market share in hosting sites. Since roughly 20 billion attacks have been linked to WordPress websites, strengthening WordPress site security has become important, according to the Wordfence firewall report.
However, WordPress regularly releases security updates for its software and employs a sizable security team of high-level researchers and engineers to check its system for flaws. As a result, WordPress software under the support of experts is constantly fixing the problem and improving security, and the source of the problem is not using simple security measures and monitoring traffic.
Anyone can change and share the source code on the open-source platform WordPress. Since WordPress is open-source, it is very flexible and scalable. Numerous themes, plugins, and developers with the know-how to alter the backend code can assist users in enhancing the security of their WordPress website.
The versatility of the WordPress platform is primarily responsible for its power and popularity. Despite the flexibility and advantages of WordPress, a badly setup or managed WordPress website is significantly more vulnerable to several security risks. When using WordPress, users have a lot of power and control over their website, but this power and control come with a lot of responsibility. Hackers are interested in WordPress websites because they are aware that many users disobey certain obligations, particularly in the area of security.
Although online dangers are always a possibility, by taking safeguards, their likelihood of happening can be considerably decreased. However, WordPress is generally secure provided users utilise security tools and adhere to security best practises. Since you are reading this, it is clear that you are concerned about security and want to take extra precautions to protect both yourself and your guests. Stay with us as we give the opportunity to enhance the overall situation and lessen the chance of hacking by offering straightforward security advice to keep your WordPress site secure.
Threats to WordPress’s security
The following dangers await your WordPress site if no security precautions are taken:
Brute force attempts to log in
The most fundamental kind of attack is brute force, in which a perpetrator uses automation to swiftly try numerous potential username/password combinations in the hopes of accurately guessing the credit. Any password-protected data can be obtained by brute-force hacking in addition to logging in.
Site-to-Site Scripting (XSS)
In order to access data, compromise it, and harm the functionality of your website, hackers utilise XXS assaults to inject malicious code into the server infrastructure of the target website. Users’ replies to forms on the website or more sophisticated server-side attacks allow malicious code to enter the system.
Database penetration
This kind of attack, sometimes referred to as SQL injections, occurs when a hacker inserts harmful codes into a website through a form submitted by an anonymous user. Then, by running on the website as a XXS attack, this code is placed in the site’s database and compromises the crucial data kept there.
Attacks using Denial-of-Service (DoS)
Legitimate users are prevented from accessing a website when it is the target of a DoS attack. DoS attacks produce server overloads and failures, which are made worse in DDoS assaults by the simultaneous usage of several machines in DoS attacks, which is particularly destructive.
Backdoors
A backdoor is a series of codes in a file that give a hacker access to site content and data at any time by evading conventional WordPress authentication. Backdoors in WordPress are difficult to locate because they are part of the source code, making it difficult for new users to find Backdoors. Hackers can tweak and recreate any form of backdoor to bypass the WordPress login lock even if you find and even delete them.
To lessen the potential of backdoors, WordPress has given users the option to establish limitations for uploading different types of files, but you must be aware of this issue and take the appropriate safeguards.
Phishing
A hacker approaches a potential victim while posing as a reliable and trustworthy company during a phishing attempt. A phishing attempt aims to trick you into downloading software, going to a dangerous website, or disclosing personal information. In order to conduct phishing attacks on your audience, the hacker first gains access to your WordPress account and then assumes your identity.
The majority of the time, hackers employ well-known security flaws to identify and exploit vulnerabilities in order to carry out such operations.
Login Page – You may reach the login pages for the admin dashboard of WordPress sites by navigating to the primary site address and adding “/wp-admin” or “/wp-login.php.” This website is easily accessible to hackers who attempt to brute force it.
WordPress versions from the past – WordPress provides updated versions of its software to address security concerns. Hackers frequently target WordPress versions that have issues since bugs are resolved, fixes are offered, and breaches are made public.
Plugins – The majority of WordPress security flaws are caused by third-party plugins. Because they were created by a third party and have access to your website’s infrastructure, plugins are a frequent approach for hackers to impede its functionality.
Themes – Additionally, WordPress themes can leave your website open to hacking. Hackers can access your source files through incompatibilities between recent WordPress releases and ancient, obsolete themes. Additionally, a lot of third-party themes lack WordPress code standards, which might lead to compatibility issues or security flaws.
Because of this, it’s important to be aware of security gaps and vulnerabilities and to utilise security techniques to strengthen the security of your WordPress site. We’ll go through the best techniques below.
1.locking down the login procedure
The first and most crucial step in safeguarding your website is to protect your accounts from unauthorised login attempts. You should customise your password and make it challenging for the database, FTP accounts, WordPress hosting account, and email addresses as well because hackers can steal the password to do things for which you can’t even imagine the repercussions. This security does not stop with the WordPress admin account. To achieve this:
Utilize strong passwords
Because they can’t remember complex passwords, people frequently choose the simplest passwords to get into WordPress, which compromises security. Your password should be a complicated, random combination of 14 numbers, capital, lowercase characters, and symbols to make it more difficult for others to access the website.
Remember to avoid using easily guessed passwords or personal information like name, date of birth, etc. while saving your password outside the website directory in an offline file or on your mobile device. Additionally, if additional users are permitted to access your WordPress account, make sure they all log in using strong passwords. Changing the password frequently, roughly every two months, is another effort to boost WordPress security.
Make two-factor authentication available (2FA)
Enabling two-step authentication is the finest choice if you’re seeking for an easy-to-use security solution to safeguard a website user’s authentication process. Google has supplied customers with two-step authentication, which is a 6-digit temporary password sent to you over a period of time through a different device, such as a cell phone, to input WordPress in order to confirm your identity. In this instance, even if the site’s login and password were disclosed, a third party would still need to input the Google security password in order to access the user account for your WordPress site.
You can activate and install the following plugins in WordPress to set up two-factor authentication.
Authentication using two factors
Google Authenticator WP Security Question for OpenID
To enable them, you must click the two-factor link in the WordPress admin sidebar. You can also use one of the following authentication apps on your smartphone after launching the Google Authenticator plugin to obtain a temporary password.
Google Authenticator
Authy
LastPass Authenticator
Avoid allowing an admin user account to be created.
During brute force attacks, hackers frequently use admin as their first account to access into the system. Create a new account using the new name if you created a username that included “admin” using one of the following techniques:
Delete the previous username and create a new one.
Editing the username using the username change plugin
Through phpMyAdmin, modify your username.
Limit login attempts
Limit the number of failed login attempts to avoid brute-force attacks. Some web hosts and firewalls will automate this for you, but you can also solve the problem by using a plugin like Limit Login Attempts or Login LockDown.
Insert captcha
Captcha adds an additional degree of security to your authentication by attempting to determine if you are a real human or a robot. You may have encountered this security feature on other websites. You can activate Google reCaptcha in WordPress or instal the reCaptcha by BestWebSoft plugin to add a captcha to the website.
WordPress login page hidden
You can conceal the login page on the WordPress website to make it more secure. As you are aware, the wp-login.php address is the standard method for accessing the WordPress login page, and using the wp-admin address will automatically take you there.
Changes to the default URL https://example.com/wp-admin cause automated programmes to target the incorrect page.
Several security plugins take care of this for you. The login page and the primary WordPress folders can also be concealed using the following plugins.
plugin for Cerber Security & Antispam
Plugin for WPS Hide Login
Plugin WP Hide & Security Enhancer
Turn on auto-logout
Even if you always log out of your WP WordPress account after you’re finished, it’s a good idea to use this option just in case you forget. This will prevent anyone else from unintentionally accessing your account. With the help of the Inactive Logout plugin, WordPress may log you out after a set amount of time.
2.choose a secure hosting provider for WordPress
When choosing web hosting services, there are many things to think about, but security should be at the top of the list. Cheap hosting isn’t always the best choice; occasionally, spending more for excellent security and peace of mind is worth it when purchasing a hosting service from a trustworthy hosting provider.
Think about firms that offer services and have put safety measures in place to guard against data breaches and retrieve data swiftly in the event of an attack or vulnerability. In order to avoid dealing with the performance weaknesses of the hosting against security threats, conduct the necessary research on the hosting firm before purchasing hosting.
On the other hand, if you consider the security of your WordPress website to be crucial, you should be more cautious while selecting the hosting services. By purchasing a VPS, you can host your website with high security because, in addition to having a separate partition from the server with enough resources, you also have more control over site management with root access and the ability to modify the security settings by taking advantage of the VPS customization feature. (If you still aren’t certain of the security differences between VPS and shared hosting, or if you’re having trouble deciding between a VPS and a dedicated server, reading our articles can help.)
Advice on how to stay safe while purchasing hosting services from a respected provider
The ability to use SSL for free,
Round-the-clock assistance from a knowledgeable team with a quick reaction to address any security issues and stop vulnerabilities in their tracks.
Instantaneous database monitoring and continuous file backup
3.Utilize the most recent WordPress version.
Hackers frequently attack websites using earlier versions of the WordPress platform. Check for WordPress updates as soon as you can, and update them frequently, to lessen vulnerabilities. Prior to updating, don’t forget to create a backup copy of your website. Before updating, it’s also important to make sure that plugins are compatible with the latest version of WordPress. You can take advantage of the WordPress instructions to update WordPress.
4.PHP should be updated
Upgrading to the most recent version of PHP is among the most crucial things you can perform to safeguard your WordPress website. Typically, WordPress will alert you to new PHP updates in the admin panel. Visit your hosting account to update your PHP version.
5.putting security plugins in place
One of the crucial security steps is installing one or more trustworthy security plugins on the website. By automating previously manual security chores, such as detecting intrusion attempts, changes to sensitive source files, restoring your WordPress site, and safeguarding content from invasions like hotlinking, these plugins help you save time and effort. Most of the aforementioned functions are supported by dependable plugins.
NOTE-Make sure a plugin is legitimate and has a solid reputation before installing it.
Tips about plugins:
Try to keep any WordPress plugins you use active. The efficiency of your site might be negatively impacted by utilising too many plugins, and the more plugins you use, the greater the security threats.
Use only recently updated plugins because older versions may include security flaws or harmful code that might damage your website.
Utilize plugins from the WordPress.org website instead of downloading them from dubious sources, or you can use those created by a respected developer.
6.choose a secure theme
Similar to plugins, WordPress themes should be carefully chosen; do not be seduced by their attractive appearance and download them from anywhere. The easiest method to guard against vulnerabilities on your site is to select a theme that adheres to WordPress best practises.
You can be uncertain about whether a theme complies with WordPress requirements. As a result, you may copy the URL of your site (or any other WordPress site or live demo version of any theme) into the W3C validator to see if the theme complies with WordPress standards. You should use a new theme from the primary WordPress themes directory if your current theme does not adhere to the criteria.
7.Activate SSL/HTTPS
A Secure Sockets Layer, or SSL, is a mechanism for encrypting communications between a website and a user’s web browser. You presumably already know what an SSL certificate is. The data exchanged between your website and visitors’ computers cannot be viewed by an unauthorised third party thanks to this protocol.
Enabling SSL improves your site’s SEO and has a noticeable effect on how new visitors view it. Because Google Chrome detects such sites, alerts people who visit the site, and causes visitors to leave, sites without SSL protocol are linked to a drop in traffic.
To check if your site is SSL-enabled, go to your WordPress admin panel. A homepage address that begins with “https://” denotes a connection that is SSL-secured (the “s” stands for “secure”). The SSL protocol has to be configured on a website if the URL starts with “http://”.
8.putting in and turning on the firewall
To prevent any unauthorised traffic from entering your network from outside, your WordPress hosting network should be firewalled off from the rest of the network. Firewalls stop malicious activity from accessing your system by blocking communication between your network and other networks.
In order to make your WordPress site secure, you must instal a Web Application Firewall (WAF) plugin. As with the other items we discussed, you should select a firewall and plugin that will effectively serve your purposes. You could include a Web Application Firewall (WAF) plugin to secure your WordPress website.
We offer two types of firewalls:
Website Firewall at the DNS Level: These firewalls pass all of your web traffic through a private cloud-based network of proxy servers. Therefore, only actual visitors are forwarded to your web server.
Application Level Firewall: This firewall plugin examines traffic before WordPress scripts are loaded on the server. However, it is ineffective in ensuring the server runs smoothly with the rise in traffic as much as the DNS Level Website Firewall.
9.Providing website backup
No user wants to endure the awful effects of a website hack; even worse, no user wants to experience the agonising loss of sensitive and valuable information that could result from an attack or any other occurrence. Therefore, you may avoid this by periodically backing up your data. This is why you need to confirm that your website’s data has recently been backed up by WordPress and your host. More significantly, we advise making backups automatic.
10.Doing WordPress security checks to look for threats and vulnerabilities
Regular security audits should be performed on your website. When using plugins, it is best to frequently scan for malware and security flaws. You should also examine your website at least once a month to enhance site traffic and improve search engine rankings.
You can add your website URLs to perform online scans, and their crawlers will thoroughly check your site for known viruses and harmful code.
It’s crucial to keep in mind that while the majority of WordPress security scanners are in charge of checking your website, they are unable to remove malware or deal with the effects of a hack.
11.Modifying the prefix of the WordPress database
The default prefix for all tables in your WordPress database is wp_. By using the default WordPress database prefix, you expose your table name to attack. It is therefore preferable to modify the WordPress database prefix.
NOTE -You must be an expert at coding and programming to accomplish this. Your website could suffer major damage if you are unable to do this task successfully or lack the necessary technical competence.
12.WordPress disables file editing
The user can modify the plugin and theme files from the WordPress admin area by leveraging the ability to edit the internal code in WordPress. As it could be used maliciously, we advise that you disable this feature. In the wp-config.php file, add the following codes to stop WordPress from allowing file editing:
1.// Disallow file edit
2.define( 'DISALLOW_FILE_EDIT', true );
FAQ
Can WordPress sites be readily hacked?
WordPress sites are safe and have security features added by WordPress developers with every security update, but because WordPress is the most popular CMS in use right now, it is frequently the target of cyberattacks. It operates more than 31% of all websites worldwide. WordPress is extremely popular among users, making poorly protected WordPress sites easy targets for hackers.
How can I make my WordPress site more secure?
Protect the login process for your account.
Use a secure host to instal WordPress.
Use WordPress’ most recent version.
Update the PHP version that is installed.
Install plugins to improve security.
Utilize a secure WordPress theme by installing it.
Turn on HTTPS/SSL connections that are secure.
Set up a firewall.
Conclusion
WordPress is the most well-known and widely used content management system in the world, making it a safe platform; however, hackers are constantly coming up with new ways to threaten online activities and use businesses’ online presences for illegal gain. Security experts are also working to combat hackers. Increasing site security is thought to be one of the most crucial challenges for all users, as everyone is seeking to preserve security on the Internet in some way.
In this article, we discussed the potential threats to WordPress sites as well as methods for keeping your WordPress site secure so that you can shield your priceless assets from harm. Although there are many security precautions for WordPress sites, you may experience having a secure WordPress site by understanding and utilising the fundamentals, such as logging in, using wp-config.php, htaccess files, and security plugins.
We sincerely hope that this post has been useful to you in putting effective and straightforward security measures for WordPress sites into place. If you have any suggestions for enhancing the security of your WordPress website or any queries on the subject, please share them with us.
Web servers are computer programmes that receive user requests sent through HTTP network protocols or its secure variant, HTTPS (used for delivering web content) and process them before returning the results to the users in the form of pertinent documents. Communication between the receiver service and the service provider (server) is made possible by protocols like HTTP (client).
You’ve probably heard of Nginx and Apache and are familiar with them to some extent, but Caddy may be unfamiliar to you. Contrary to popular belief, Caddy, a newly discovered web server, has managed to win over many fans with its adaptability and top-notch performance and has established itself as a formidable rival to Nginx and Apache.
When Apache was introduced as the first web server in 1995, users were forced to use it as such and were not concerned about selecting a web server that would meet their needs. With the development of technology and the increased diversity of current web servers, selecting a web server has grown more challenging.
Because we choose to explore the major components of the distinction between Caddy, Nginx, and Apache web servers in this post, it might be an excellent reference for selecting the appropriate web server for your needs by contrasting Caddy, Nginx, and Apache web servers.
The Apache definition
Although we have already discussed what a web server is and what it does, we did provide a brief overview of those operations at the beginning of this post. In 1995, Apache became the first and most widely used web server on the market as a result of the development and global conquest of the Internet in the 1990s. Apache was required to receive documents from a particular address upon user request and to deliver the response in the user’s browser using the DNS and IP system. Web servers are therefore crucial to the delivery of website content.
As a result, Apache, created by the Apache Foundation and maintained under the Apache licence, is the oldest and most frequently used web server. Because of its antiquity, this web server now supports more than 46% of all websites on the planet.
The Httpd server process in the market is another name for Apache, a cross-platform, free and open-source web server created in the C programming language. Most web servers can run both Windows and Linux operating systems, however Linux and Linux VPS are among the best operating systems for running web servers. Both in cPanel hosts and as a component of the LAMP stack (Linux, Apache, MySQL, and PHP), Apache is used.
Features of the Apache web server
It is an essential part of LAMP (Linux, Apache, MySQL, and PHP).
suitable for websites powered by WordPress.
The oldest web server is that one.
On Linux servers, it performs really well.
.htaccess files enable further settings on any directory.
It also supports MS Windows in addition to Unix systems.
It suggests using a process-driven methodology and an event-driven architecture.
makes a fresh thread for every request.
There is a sizable, ongoing support network for it. Through mailing lists, IRC, and stack overflow, it is frequently maintained by the knowledgeable team of ASF programmers and independent businesses like OpenLogic.
Apache web server drawbacks
With various configuration options, security vulnerabilities could be introduced. On websites with high traffic, it doesn’t operate at its best, and its performance could be affected.
Presenting Nginx
To address the C10K issue, a Russian programmer named Igor Sysoev created and sold a web server called Nginx in 2004. (management of web sockets for simultaneous connection of users). In those years, web servers had trouble connecting more than 10,000 users at once and responding to requests in a timely manner. Nginx was created to address these performance issues.
Therefore, 10,000 simultaneous connections can be handled by this programme without affecting the overall set’s performance. This feature of Nginx sets it apart from its rivals and enables it to examine related requests collectively without starting a separate process.
Therefore, 10,000 simultaneous connections can be handled by this programme without affecting the overall set’s performance. This feature of Nginx sets it apart from its rivals and enables it to examine related requests collectively without starting a separate process.
Nginx was created in 2011 under a new brand name for its company, Nginx Plus, and is developed and maintained as an open-source web server under the terms of a two-clause BSD licence. Today, Nginx serves as a reverse proxy and load balancer for HTTP, TCP, and UDP servers in addition to being a web server. Also, the IMAP, POP3, and SMTP protocols are handled by this web server as proxies. As a result, the use of this programme goes beyond just delivering documents and web information.
Because of its lightweight design and low resource usage, the Nginx web server has a high speed that effectively improves performance. Nginx’s quick speed and top performance are additional benefits.
Nginx is utilised as a web server by websites like Google, Microsoft, Apple, Facebook, Twitter, Linkedin, Netflix, Dropbox, IBM, Adobe, Cisco, and others. Thanks to its features, 40% of the most popular websites and well-known companies in the world have taken notice of it.
Although the differences between Apache and Nginx can be compared from several angles and in greater detail, we won’t do so in this post. The most intriguing fact is that despite having a longer history than Apache, Nginx has eclipsed Apache as the most used web server, and its market share is growing every day. Nginx was created with the intention of resolving issues with web servers like Apache, and at first it was utilised as an addition to the Apache web server.
Web server Nginx features
It is small and uses fewer resources.
effectively manages static content.
It is a fully developed web server that serves as a reverse proxy, load balancer, mail proxy, and HTTP cache in addition to other effective applications.
Mailing lists, IRC, stack overflow, and forums are used for support.
It works nicely with websites that are hosted on VPS.
It controls over 10,000 users who connect at once.
It suggests using an event-driven strategy.
manages a thread of several requests.
Nginx’s drawbacks
It provides you with fewer modules and plugins than Apache does.
fails miserably on Windows.
Although it is utilised more than Apache, it has less support communities.
Define Caddy
Carl Drechsel created and developed Caddy, an open-source, multi-platform web server, in 2015 with the goal of being user-friendly, portable, effective, and offering a secure environment. GitHub also hosts this software. The Caddy web server offers by default support for HTTP/2 and HTTP, as well as HTTPS by supplying and renewing certificates (through Let’s Encrypt). Because Caddy supports HTTPS, users can access the websites that Caddy offers on a safe network.
Caddy was created using the Go programming language and standard Go libraries. It can therefore be installed on any system that Go is compiled for, including Windows, Linux, Solaris, BSD, and macOS. Caddy differs from the other two web servers we discussed in this post in that it offers functionalities right out of the box.
Despite its youth, Caddy has been able to win over a lot of fans because to its top-notch features. More than 20,000 people have downloaded and installed this web server so far, and 4,500 of them have given it stars on GitHub.
One of Caddy’s useful features is the implementation of the most recent transport security standard (TLS 1.3). Depending on your needs, Caddy can be modified and expanded. For simple control and maintenance of numerous websites on one server, Caddy includes a web-based management interface.
Caddy Webserver offers licencing in three distinct ways, as should be noted: 1. Individual 2. Small-Scale Business 3. Serious commercial
Caddy is simple to use, instal, and configure; just get the correct static binaries for your system from GitHub and set it up. Any website that begins using Caddy will automatically use HTTPS and will be given a free security certificate, similar to what Cloudflare offers.
Advantages of a caddy web server
Let’s Encrypt TLS certificates are automatically received and managed to enable HTTPS serving static files.
Give websites security certifications
Support for HTTP/1.1 and HTTP/2 by default
backward proxy support
simplicity in installation and use
high tempo
Balanced loads and ongoing health checks
FastCGI Proxy assistance
support for Gzip
host a virtual server on a port
Disadvantages of Caddy
There isn’t a lot of documentation on training and troubleshooting available.
Some functional features are not supported.
For big websites with lots of traffic, performance might not be optimum.
Its market share is modest.
Configuration of Apache vs. Nginx vs. Caddy
Configuration of the Apache web server
The primary Apache web server configuration is stored in the /etc/httpd/httpd.conf file in Red Hat Enterprise Linux and Fedora-based distributions, as well as the /etc/apache2/apache2.conf configuration file in Debian-based editions.
The required configuration of the Apache web server is as follows:
To specify a different configuration file, you need to use the -f flag along with other directives.
To setup the web server in multiple.conf files, use theIncludecommand.
You can edit the.htaccess file at the directory level in the server setup to modify specific websites without changing the overall settings.
In Debian-based distributions, you can use the a2enmodanda2dismodcommands to enable and disable a module without making any modifications to the web server’s primary configuration.
NOTE-It is advised to disable.htaccess files by setting the AllowOverride directive to none because activating this file may result in increased TTFB and CPU consumption, which reduces performance.
NOTE- Restart Apache after making the necessary modifications to the web server settings for them to take effect.
Configuration of the Nginx web server
In Linux and Unix operating systems, you can look in the /etc/nginx/ directory to discover the main Nginx configuration file with the name nginx. conf. The following configurations for Nginx are available:
By generating a worker process in each CPU, Nginx reduces the amount of hardware resources that are consumed.
The worker processes directive in Nginx has auto set as one of its default settings.
Instructions are organised into blocks or fields for Nginx configuration. You may see an illustration of the Nginx configuration file in the section below:
user www-data;
worker_processes auto;
pid /run/nginx.pid;
include /etc/nginx/modules-enabled/*.conf;
events {
. . .
}
http {
. . .
}
Configuration of the Caddy web server
Caddy supports JSON and several adapters in its configuration. Caddy main configurations include the following:
Standard Caddyfile can be used to configure Caddy.
Following is an illustration of a “Hello World” configuration in Caddy with a connection to port 3000.
:3000 {
respond “Hello, world!”
}
Start the web server by typing the caddy startcommand after stopping the server by pressing the Ctrl+C keys in order to restart it and apply the modifications. (Starting the Caddy server daemon by typing caddy run in the command line)
You can reload the caddy by running the caddy reloadcommand in a different terminal environment to apply the updated settings.
The phrase “Hello, world!” can be accessed. You can use the curl command or a browser search to find http://localhost:3000:
$ curl http://localhost:3000
Hello, world!
Implement a static file server by running the the file servercommand.
For proxies to send requests to PHP FastCGI, enter the php fastcgicommand.
Incoming traffic is routed to one or more backends using reverse proxycommand after load balancing, health checks, and automatic retries.
FAQ
Is Apache more secure or Nginx?
In terms of overall security, there is no discernible difference between the two, but if we were to compare them specifically, Nginx would win out for performance and management of both static and dynamic content. The operating system support, versatility, module support, and security of Apache are superior.
Can Apache and Ngins run simultaneously on the same system
Yes, you can combine two web servers to increase performance. For instance, use Apache to handle configuration customization needs and Nginx as a backup web server and reverse proxy server to get the best performance.
It is important to note that you cannot operate two web servers concurrently without modifying the ports and IPs of the web servers from their default setup because both web servers utilise the same port and IP to listen.
Which one is faster ngins ,apache or caddy
Although Nginx handles more requests than Apache, it performs quicker than Apache because it manages thousands of incoming connections optimally per worker and has worker processes per CPU/core. To compare Nginx and Caddy, you can gain performance with a high speed of about 10–20% using Caddy if the metrics code is removed and appropriate modifications are made.
Conclusion
There are many different web servers available nowadays, and each one stands out from its rivals thanks to special features. In this essay, we analysed and discussed the differences and characteristics of three widely used web servers: Apache, Nginx, and Caddy.
Due to the fact that Nginx overcame the drawbacks and limitations of earlier web servers and was able to handle a large volume of simultaneous requests, Nginx has won the largest market share in this battle.
Additionally, Nginx provided users with the new Plus brand, which includes a number of extra support capabilities for media streaming, monitoring, and load balancing. But it’s important to remember that Caddy’s straightforward configuration and Let’s Encrypt’s automated HTTPS support. Additionally, Caddy offers some Nginx capabilities that are exclusive to its non-free Plus edition to users without charge and has accelerated its development to keep up with rival web servers.
Caddy web servers are appropriate for tiny sites and concentrate on performance and usability, whereas Apache and Nginx web servers are good for handling high traffic volumes and supplying vast amounts of static material. If adaptability and customisation are important to you, Apache can satisfy your needs.
Considering your requirements and expectations can help you choose the best web server among these three well-known options. In addition, one of the notable benefits of Caddy is the simplicity of configuration and use, therefore if you’re seeking for ease of use, you should choose the Caddy web server. Nginx is the best web server for managing high traffic.
We hope that the comparison of the Apache, Nginx, and Caddy web servers will help you select the one that best meets your requirements. Which of the three web servers we covered in this post, in your opinion, would be the best based on our review? We are interested in reading your thoughts and experiences with the web servers Caddy, Nginx, and Apache. Let us know about them in the comments section.
![How Can Linux Users Connect to a Remote Server Using SSH? [Edition 2023]](https://olivevps.com/wp-content/uploads/2023/01/LS3.jpg)