
by Sanjana Shruti | Mar 4, 2023 | Uncategorized
 Yarn, created by Facebook in 2016 for the Node.js JS runtime, is the top JavaScript package manager. In order to address issues with consistency, security, and performance with large code bases, Yarn, an alternative to the npm package manager, was developed in partnership with Facebook, Exponent, Google, and Tilde (the firm behind Ember.js). People can create their own custom Yarn plugins. This article will teach you how to set up Yarn on Ubuntu 20.04.
Compared to npm, Yarn has the features mentioned.
- From the local cache, Yarn can load packages.
- Versions of the box are tightly bound by yarn.
- While npm uses SHA-512 to verify the data integrity of the downloaded packages
- yarn uses checksums to guarantee data fidelity.
- While npm installs one package at a moment, yarn installs packages simultaneously.
Requirements
- VPS/Dedicated Host 99RDP (Running Ubuntu 20.04)
- Entry To The Station
- Installation of npm and node.js
How To Setup Yarn On Ubuntu 20.04: Steps
Corepack, a new binary included with all Node.js versions starting with 16.10, is the best method to manage Yarn. It serves as a bridge between you and Yarn and enables you to use various package manager iterations on numerous tasks without registering the Yarn binary. If Node.js and npm packages are not already loaded on the system, follow the instructions to install them.
# sudo apt update
# curl -fsSL https://deb.nodesource.com/setup_19.x | bash – &&\ apt-get install -y nodejs
When the installation is complete, we can execute the version command to confirm it.
# node -v
# npm -v
For us, the most recent versions of npm and node are 9.6.0 and 19.7.0, respectively. All Node.js installations come with Corepack by default, but it is presently optional. Run the following instruction to make it active.
# corepack enable
Now that Yarn’s prerequisite packages have all been loaded, we can start the installation process.
How To Setup Yarn On Ubuntu 20.04 Using The Most Recent Version
We’ll use Corepack to install yarn in its most recent version. The experimental tool Corepack serves as a point of interaction for users and Yarn while assisting with managing the versions of your package managers. Run the provided code in the terminal to install the most recent Yarn version.
# corepack prepare yarn@stable –activate
The given command can be used to verify the version of the package manager after it has been activated.
# yarn –version
The most recent release for us is 3.4.1. Yarn’s most recent stable version is installed using this procedure.
Methods For Making A Yarn Project
Please navigate to the project directory and execute the provided instruction to start a new Yarn project.
# yarn init
Yarn creates two files to set up the project location. One is the yarn.lock file, which saves the dependency information, and the other is the package.json file, which includes the project configuration.
How to Setup Additional Yarn Packages
The package.json setup file is how Yarn operates. This file contains a list of every programme required for your project. You can add a package with extra dependencies while working on a project. Run the provided instruction in the terminal to accomplish this.
# yarn install
root@ubuntu20:~# yarn install
➤ YN0000: ┌ Resolution step
➤ YN0000: └ Completed
➤ YN0000: ┌ Fetch step
➤ YN0000: └ Completed
➤ YN0000: ┌ Link step
➤ YN0000: └ Completed
➤ YN0000: Done in 0s 101ms
All of the requirements for the configuration of your project will be updated and loaded.
Conclusion
In this tutorial, we’ll show you how to set up the most recent stable versions of node.js, npm, and yarn for JavaScript project management and version control development. Additionally, you now understand how to build up your first yarn project. Follow the link to the official Yarn wiki article to learn more.
Read Our Next Aarticle How to export your Google Chrome bookmarks

by Sanjana Shruti | Mar 3, 2023 | Uncategorized
 Would you like to transfer your stored bookmarks from Google Chrome to another browser? We demonstrate the process. To make switching to another browser as simple as feasible, you can export your bookmarks from Google Chrome in just a few simple steps. You’ll see how to do it from us.
to a Google Chrome note They must first be saved in order to be used in another browser or on a different device. You must save your bookmark collection as an HTML file on your computer in order to do this. We will describe how it operates below.
Exporting favourites from Google Chrome is effective.
The Quick start guide or our step-by-step directions should be followed.

Open Google Chrome and select the three dots in the upper right corner. then choose “Bookmark” and “Bookmark organiser” from the list. If the bookmark bar is visible, you can also right-click on it and choose “Bookmark manager” immediately.
 Then click on the centre of the three points on the right. Click “Export favourites” after that.

Decide now where you are. If you’d like, save the bookmarks file. This is referred to as a computer-stored HTML file. Click “Save” once you’ve settled on a location.
Conclusion
By enabling you to export your bookmarks as an html file, Chrome makes it simple to transfer your bookmarks to another browser or machine.
Read Our Next Articles How to Use Terminal to Verify the Version of CentOS

by Sanjana Shruti | Mar 3, 2023 | Uncategorized
 You should be aware of the OS version you are using for a variety of purposes. For instance, understanding the operating system version makes things much easier when installing software or troubleshooting system issues. Maintaining an updated Linux operating system is also beneficial. The maintenance for CentOS 7 will last until June 30, 2024. How long your system will be maintained depends on your CentOS version. Several commands on how to use the terminal to verify the version of CentOS are shown in this guide.
Requirements
- Access To Terminal
- VPS/Dedicated Host 99RDP (Running CentOs)
How to Use lsb to Verify CentOS Version
To standardise the software system structure, several Linux distributions are working together on the Linux Standard Base (LSB) initiative. To create and advance an open standard that improves interoperability between Linux distributions and enables software apps to function on any system that complies, even in binary form. It is possible to verify the dissemination details using the straightforward lsb release -d command. Run the provided instructions in the terminal to install and verify the CentOs version.
# yum install redhat-lsb-core -y
# lsb_release -d

How to Use hostnamectl to Verify the Version of CentOS
The following utility is included with CentOs versions by default. The hostnamectl command can be used to verify the system hostname and other system-related data. Examples include the current kernel version, machine Number, system hostname, operating system information, and more.
# hostnamectl

Steps To Check CentOs Version Using rpm
The command-line tool rpm is used to manage, search, and analyse rpm packages and system-related data. To check the CentOs version using rpm, type the provided command in the terminal.
# rpm –query centos-release

How To Verify CentOS Version Using The Os-Release File
To obtain OS version details from the os-release file, use the provided command.
# cat /etc/os-release

Conclusion
This article taught us four ways to use the terminal to verify the version of CentOS. That’s all I have right now! Please let us know if you are aware of any additional techniques that should be included. Visit the provided link for more details on CentOS releases.
Read Our Next Articles Adding People To A Sudo Group In Ubuntu 18.04

by Sanjana Shruti | Mar 1, 2023 | Uncategorized
 With the help of the command-line tool sudo, a particular user (or group of users) can execute some (or all) commands with root privileges while maintaining a record of all inputs and outputs. It functions according to each instruction. A “ticketing” method is implemented using timestamp files. A user is given a ticket for 5 minutes, for instance, if they run sudo and input their password. For another five minutes, each successive sudo command updates the ticket. The system administrator can use this utility to change the sudo conf file’s command duration. The conf file is also made up so that it can be copied to numerous machines. This article will show you how to add people to the sudo group. Ubuntu 18.04 is used.
Requirements
- Terminal Access
- 99RDP VPS
Making People Members Of The Sudo Group In Ubuntu 18.04
To begin, either use Putty or log into the computer using the provided command.
# ssh root@99RDP_VPS_IP
Use the provided command to upgrade the VPS’s software and repository list.
# apt-get upgrade
# apt-get update
- Create a new user by executing the provided command after the update is complete, then set the password..
# adduser test
- Enter it once more to validate.
- We will now use the usermod tool to add this 99RDP user to the sudo group.
A Linux programme called usermod can be used to modify a user’s settings remotely. You might need to modify a user’s attributes after establishing them, such as the password or login directory.
# usermod -aG sudo test
Authenticating Sudo Credentials
- Use the user command to switch to the new “test” account.
# su test
- Try listing the files in any root location after changing accounts without using the sudo command. For instance:
# ls
- Use sudo to execute the same instruction now.
# sudo ls

- Open the /var/log/auth.log file to view the logs for each sudo user account on the server. Enter the instruction when prompted to do so.
This will display a list of commands that sudo users have executed. You can see that the ls query was executed by the sudo user in the output.

Conclusion
We learned how to add users to the sudo group in this tutorial. This makes it easier for system administrators to manage checking freshly created user accounts for different criteria. This gives you greater power over the degree of permissions you give to particular users. Please stop by if you have any queries or suggestions.
Read Our Next Articles How To Modify Hostname Ubuntu 18.04:

by Sanjana Shruti | Feb 28, 2023 | Uncategorized
 A object on a network is given a label called a hostname. On a specific network or the Internet, it separates one device from another. On the household network, the computer’s hostname might be something like New Notebook or FamilyPC. The hostname is also used by DNS servers, allowing you to reach a website with a well-known and simple-to-remember name. This eliminates the need to enter a series of digits (IP addresses) in order to access a website. When installing Ubuntu, the hostname is changed, or if you create a virtual machine, the hostname is dynamically given to the instance at startup. You will learn how to modify the hostname on Ubuntu 18.04 in this tutorial.
Requirements:
- Entry to the terminal
- Dedicated/Private RDP 99RDP
Verifying the Existing Hostname Ubuntu 18.04
Let’s examine the system’s current hostname specification before making the change. Run the aforementioned command in the terminal to discover that.
# hostnamectl
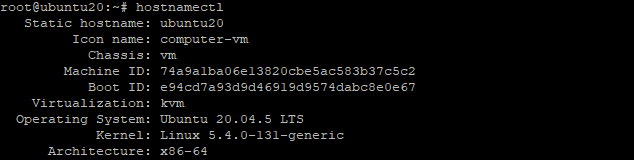
The present hostname and a tonne of other system information are output by this command.
How To Modify Hostname Ubuntu 18.04:
Run the provided command with your new hostname included to update the hostname on Ubuntu. Replace 99RDP with the address that you need.
# hostnamectl set-hostname 99RDP
Once the hostname is changed you can verify the changes by opening the given file /etc/hosts. To open the file in a text editor run the given command
# nano /etc/hosts

In this tutorial, we’ll replace Ubuntu 20 with 99RDP as the hostname. Save the file after making the necessary adjustments.
Using cloud.cfg, preserving the changed hostname
Any hostname modifications will be lost upon a system reboot because Ubuntu by default does not preserve hostname changes. The new cloud configuration, which sets the serve hostname value to false, is the source. Special scripts known as cloud-config files are created to be executed by the cloud-init procedure. These are typically used for initial setup during a server’s very first boot.
Check to see if the cloud-init process is enabled in order to maintain the hostname. Run the provided instruction in the terminal to accomplish that.
# ls -l /etc/cloud/cloud.cfg
The result will be file does not exist if it is not installed. However, execute the provided apt command in the terminal to install the provided script.
# apt-get install cloud-init
Run the ls command once more after the script has been loaded. This time, it will return the script’s authorization and path.
# ls -l /etc/cloud/cloud.cfg

Now use nano or another editor to access the relevant cloud.cfg file. Retain Hostname must be set to TRUE as opposed to FALSE. To do that, run the provided command to access the file.
# nano /etc/cloud/cloud.cfg

Lastly, the hostname will remain the same if you restart the server. Execute the hostnamectl command once more to confirm the adjustments.
# hostnamectl

Conclusion
The establishment of new instances is one of many causes for changing the hostname. You can change the hostname on an Ubuntu 18.04 server without having to restart it thanks to the instructions in this tutorial. I hope this aids you in setting up your server effectively.
Read Our Next Articles How To Setup Python On Ubuntu 18.04